 Fig 19 |
Pegasus Mail for Windows On-Line Guide Part 4
- 5.1 Creating a New Folder
- 5.2 Filing Trays
- 5.2.1 Creating a new Filing Tray
- 5.2.2 Putting folders inside a Tray
- 5.3 Moving Messages into a Folder
- 5.4 Copying Messages into a Folder
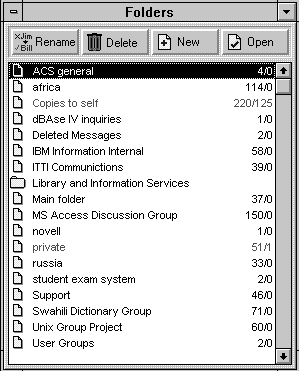
Folders are used to manage your mail messages. After you have read your new mail, the messages are moved to your Main Folder (unless you have set your Preferences otherwise). This folder will soon become quite large and unmanageable if you don't take action. You can create a new folder at any time (say for a particular subject, or to hold all the messages from one person) and then move any messages from other folders into that new folder.
 Fig 19 |
 Fig 20 |
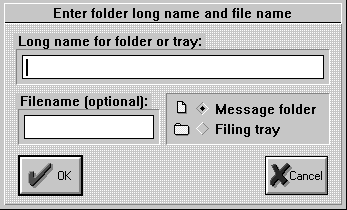
A Pegasus Mail folder has two names - one is the Long name as it will appear in the Folders panel and the other is an 8-character filename used to store the actual contents of the folder on your disk. This Filename is optional - if you leave it blank then Pegasus Mail will generate a unique filename and use that instead. This can be changed later if you prefer to see files with meaningful names.
You have now created a new folder, and you can now use that folder for storing any messages. The long name of the folder appears in the list shown in the Folder panel. You can also use the Rename or Delete buttons (and dialog boxes) to change the names of folders in the list. Click on the Cancel button to return to the previous window.
Versions of Pegasus before version 2.0 only allowed single-level folders. The post 2.0 versions allows you to create a hierarchy of folders by creating "trays", inside which can be either folders or further trays.
5.2.1 Creating a new Filing Tray
This is the same as creating a new folder except that before clicking the OK button you select the Filing Tray option.
You can either create new folders inside this tray, or move existing folders.
- click on the name of the folder to be moved;
- click on Folder Menu;
- click on Cut folder
A dialog box appears at this point (see Fig 21.), instructing you on how to complete the movement of your folder into a tray.
Fig 21
- click on OK to close this dialog box.
The highlighted folder or tray will be removed from the list and information about it will be saved in a file (called TRAYSAVE.PM) in your home mailbox directory. Once you have chosen the Cut folder command, the Paste folder command will be enabled, allowing you to insert the entry you have cut into the list at the position before the cursor.
- open the tray to receive this folder (double-click if it is closed);
- click on the Open tray icon;
- Click on Folder menu;
- Click on Paste folder.
Pegasus Mail will insert the saved item for you in the current tray. The folder may not be in alphabetical order, but the next time you open the folders you will find that this has been corrected automatically.
It is safe to exit from Pegasus Mail without pasting the entry - you can do it at any time after you have moved it.
5.3 Moving Messages into a Folder
To move messages from one folder to another, do the following:
The message will then be moved into the required folder.
To move several messages at once, simply select the required messages as you did earlier with the delete option (see Section 4.4) , and then do steps 3, 4 and 5 above.
Alternatively, you can move a message after you have read it. In the window used to read the message, simply click on the Move button and do steps 4 and 5 above.
5.4 Copying Messages into a Folder
This process is identical to moving a message (as described in the previous section) except a copy of the message will be placed in the desired folder, with the original remaining in the other folder. Note that you don't have this option available if you are actually reading the message.
Produced and Written by Paul Snell.