 Fig 22 |
Pegasus Mail for Windows On-Line Guide Part 5
- 6.1 Creating a New Address Book
- 6.2 Entering Details of a Person into an Address Book
- 6.3 Sending Mail to a Person in your Address Book
- 6.3.1 Using the short name
- 6.3.2 Using the address book to initiate the send message option
- 7.1 Creating a New Distribution List
- 7.2 Using a Distribution List
If there are individuals to whom you send Email on a regular basis, then rather than typing their Email addresses each time, you can create a 'short name' for them and use this when sending mail. For example, rather than typing f.g.smith@bham.ac.uk every time, you could use the short name Fred.
As you might want to create several lists of these short names, they are stored in files known as Pegasus Mail address books. You can have as many different address books as you need. For instance, you might have one address book for all your immediate working colleagues, and another for people who work in your field at another location. This separation of names into different address books allows more rapid retrieval of the name when using the 'browse' mode to select a person's mail name. The only thing to bear in mind is that no two people in ANY of your address books or those created by your system administrator can share the same short name - otherwise they might both get Email from you when you intended to send it to only one of them!
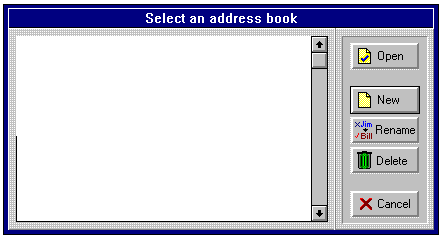
6.1 Creating a New Address Book
Fig 22 |
 Fig 23 |
You will now be able to see the address book in the updated 'Select an address book panel'.
6.2 Entering Details of a Person into an Address Book
With the Address book list still visible:
 Fig 23 |
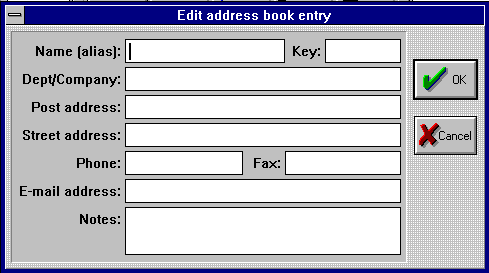 Fig 24 |
(a) in the Name (alias): field you type the short name you wish to use when you want to send mail to this individual;
(b) the Key, Dept/Company, Address, Phone, Fax and Notes fields are completely optional. They are there for your use if you want to use this Pegasus Mail address book as a simple electronic name and address file.
The Key field can be used for sorting your addresses into a required order. For example, the Name fields could contain abbreviated names and nicknames for your friends, whilst the Key fields actually contains their formal surnames or family names, so that they appear in alphabetical order when you sort them;
(c) in the E-mail address: field you must type the full Email address that will be used when sending mail to that individual. This is the Email address that Pegasus Mail will use when you enter the short name in the To: field when sending mail.
- when you have entered all the details you need, click on the OK button.
You can enter as many short names as you wish in any address book.
6.3 Sending Mail to a Person in your Address Book
There are quite a few ways of doing this, but some are more reliable than others. Here in outline are the two main methods of using this facility.
Do the following:
- click on the Send mail button in the Button Panel in the usual way;
- in the To: field type the short name (i.e. alias) that you have set up for the person;
- complete the message as normal and click on the Send button.
6.3.2 Using the address book to initiate the send message option
Do the following:
- open up the required Address book;
- double-click on the Name of the person to receive the message.
This method will automatically open up a new message and the To: will already be filled in with the information you entered into the Address book. You can then complete the message as normal.
When sending mail to several people at once, you can mix short name entries and long Email addresses.
Distribution lists allow you to send relevant mail to a group of individuals in one go. This is particularly useful if you are part of a team, or discussion group. Instead of sending mail to each individual, you send the mail using the distribution list name and this in turn will send the mail to all the people on that particular distribution list.
7.1 Creating a New Distribution List
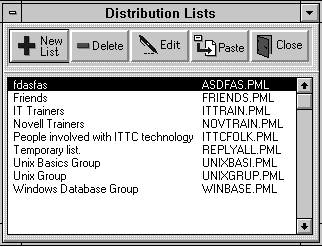 Fig 25 |
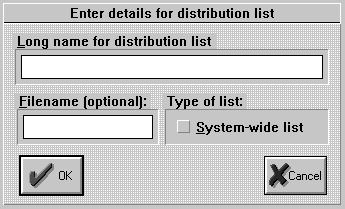 Fig 26 |
Using a distribution list is not as straightforward as using an Address Book. The instructions that follow have to be used:
In the To: field you will now see what appears to be a strange address, but it is in fact the information used by Pegasus Mail to send the mail directly to all the members of the distribution list that you selected. Quite what you see will depend on a number of things - where your mail is physically stored, whether you used a short name for the distribution list, and so on. However, you will be pleased to know that it works very effectively. Now continue to enter a subject, enter addresses for copies, and then compose and send your message as normal.
Fill in the rest of the message as you would normally.
Produced and Written by Paul Snell.