 Fig 27 |
Pegasus Mail for Windows On-Line Guide Part 6
- 8.1 Creating a New Signature
- 8.2 Using Your Signatures
- 9.1 Viewing Current Settings
- 9.2 Adjusting General Setttings
- 9.3 Tick Box Options - a brief summary
- 9.3.1 Open new mail at startup
- 9.3.2 Preserve deleted messages until exit
- 9.3.3 Ask for confirmation before deleting
- 9.3.4 Leave read new mail in new mail folder
- 9.3.5 Ask for NetWare password at startup
- 9.3.6 Encrypt copies to self of encrypted mail
- 9.3.7 Offer advanced options for replies
- 9.3.8 Save desktop state between sessions
- 9.4 Other Settings
- 9.4.1 Home Mailbox
- 9.4.2 Clickable links
- 9.4.3 Message Reader Settings
- 9.5 Advanced Settings
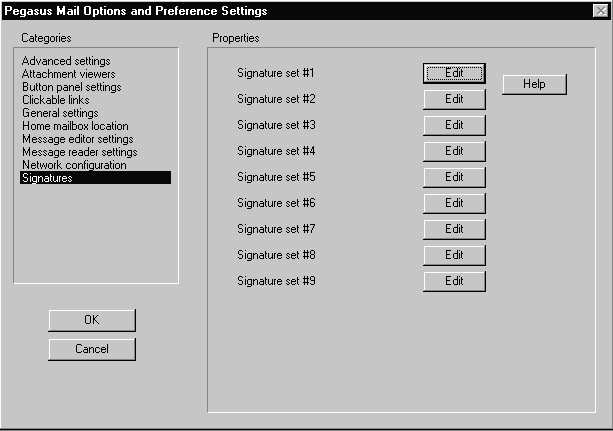
Signatures appear at the end of your message. Usually they will include information to help the receiver identify the sender, place of work, phone numbers and so on. You have complete editorial control over the appearance and content of these signatures. Many people seem to spend their entire working life designing a signature that uniquely identifies their soul.
Here is a not-untypical signature:
|
|
|
If you are designing a complicated layout for your signature, it might not look the same on the recipient's system! Spaces usually work better than tabs for clear layout.
The unfortunate thing is that there are three types of signatures you can use: there is one for local messages, i.e. for messages to colleagues who use the same Novell Server as yourself; one for use on the Internet, i.e. the one used when communicating to colleagues not on your particular Novell server; and one (called the MHS signature) which is a Novell-based standard.
The first two signatures are more important than the third. To play safe, the thing to do is to create the same signature for all three options and then it will not go wrong, but then you might not want a signature on local messages.
To add fog to this situation, you can now have up to nine different signatures for sending to different types of recipients of your mail. You could have a formal one for funders, an informal one for collaborators around the globe, and a humorous one for friends, and so on.
 Fig 27 |
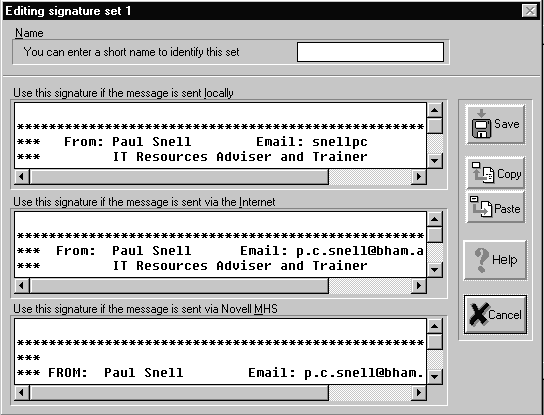 Fig 28 |
You should always start your signature with a few blank lines so that there will be a natural gap between the message and the signature at the bottom.
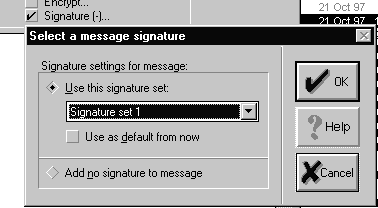 Fig 29 |
NB If the number in the brackets of the Signature() option in the message window reflects the one that you wish to use, then you need not do the previous 3 steps - that signature will be used.
There are some 'preferences' that you can set to your own liking. There are others that you are strongly urged to use in a certain manner. In these notes it will be the latter group that we will dwell on. Although this guide only considers the General Settings under the Tools, Options section, there are more options that are left for you to investigate. Some are quite complicated, and you are advised to use them only after consultation with the your Novell server administrator - in particular you should only use the Netware SMF settings and the Extended Features if you are instructed to do so.
The following screen appears:
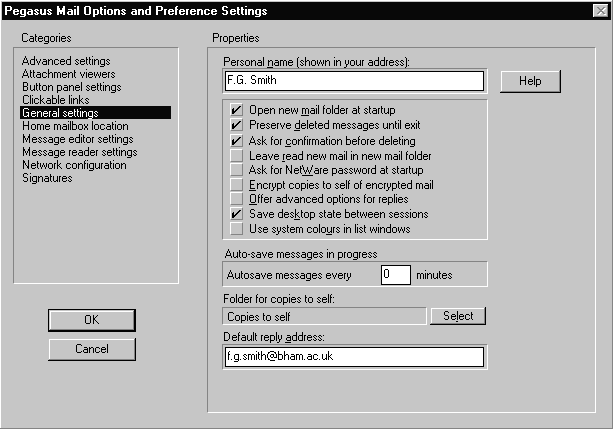 Fig 30 |
The General settings option is selected automatically from the list of options available on the left. On the right you can see the settings you can make under the General settings option.
9.2 Adjusting the General Settings
The Personal name can be included as part of your Email address information in all messages sent. It is optional, but can be very useful for those receiving your mail.
The Copies to self folder is where Pegasus will store any copies of outgoing mail should you request a copy, and it can be can be any folder you want. By default, Pegasus will create one called 'Copies to self' for you.
The important option is the Default reply address. This appears at the beginning of your message in a part of the header information labelled: 'Reply to:'. It is the address that will be used if the recipient of your mail message intends to reply to it. You should set this to your Central Email Name as opposed to your username on your local server.
For example, on the server your username might be SMITHFG. If the server is called (say) Novell2, then people anywhere could send mail to you directly using the address: smithfg@novell2.bham.ac.uk and this would work.
However, if you decide to use another server for Email, you would have to tell everyone you correspond with around the world of this change.
On the other hand, if you register with Information Services for a Central Email Address, any incoming Email sent to that address will be sent to the Central Mail Server first and then forwarded to your local Novell server. If your local server has been out of service temporarily, then the Central Mail server will hold the mail until the local server is restored. If you change servers, all you have to do is tell the Central Mail Server to redirect any incoming mail, and you don't have to tell your friends around the world. A mail name on the Central Mail Server looks something like this:
F.G.SMITH@BHAM.AC.UK
This also makes your Email name and address more intelligible to others, rather than having to include strange acronyms for the local server as part of the mailing address.
If you have previously registered for the use of one of the Information Services' Central Servers, eg Novell5, Novell1 or ISDU, you should already have a Central Email Address. If not, you can apply to the IT Service Desk, Zone GC, Main Library, ext 7171, to be registered. The IT Service Desk can also supply you with information on how to instruct the Central Mail Server to send incoming mail to a new mail server, eg stop having it sent to the ISDU service and have it redirected to your account on Novell5.
So register centrally, and put your Central Email Address in the Default reply address field.
9.3 The Tick Box Options - a Brief Summary
9.3.1 Open new mail at startup
If you check this box WinPMail will automatically open your new mail folder for you when you run it, provided it actually contains new mail.
9.3.2 Preserve deleted messages until exit
If you check this box, WinPMail will save any messages you delete in a special folder called Deleted Messages which will be cleared when you exit; this option can allow you to save messages deleted accidentally.
This can prove very useful - it is very easy to delete messages by mistake. If you do this and this option is selected, then you need only open the folder called "Deleted Messages" and move the accidentally deleted message into any other folder. It will then NOT be deleted when you switch off Pegasus Mail.
9.3.3 Ask for confirmation before deleting
If you prefer that Pegasus Mail does not ask you to confirm that you really want to delete messages, uncheck this control. If you uncheck this control, you increase the risk of accidentally deleting messages you meant to keep, so we recommend you consider turning the 'Preserve deleted messages until exit' option on.
9.3.4 Leave read new mail in new mail folder
Usually when you close the new mail folder, Pegasus Mail moves all the messages you have read but left in that folder to your Main Folder. If you would prefer new mail to stay in your new mail folder until you explicitly move or delete it, check this control.
9.3.5 Ask for NetWare password at startup
Check this and WinPMail will prompt you for your NetWare password when you run it. It will not run unless you enter the password correctly. This option adds security to your mail if you are away from your desk a lot. This control has no effect in non-NetWare environments and will not be available.
9.3.6 Encrypt copies to self of encrypted mail
If you check this control, Pegasus Mail will encrypt copies to self of messages you send encrypted, using the same key as the message. If you subsequently open them in your 'Copies to self' folder, you will need to know the password before you can read them. If this control is unchecked, then copies to self will always be stored as plain text whether or not the message itself is encrypted.
9.3.7 Offer advanced options for replies
WinPMail has an alternative reply dialog which allows you to select particular addresses from the original message for your reply. If you want to use the advanced reply dialog instead of the default simple reply dialog, check this box.
9.3.8 Save desktop state between sessions
If this is checked, WinPMail will remember the folders, address books, distribution lists and other windows you have open at the end of a session, and will automatically reopen them at the start of the next session. Checking this control will also cause the Folder Manager window to remember which trays are open between sessions.
Your Home Mailbox is where all your mail folders, distribution lists, address books and other PMail and WinPmail related files (except unread new mail) are stored. By default, it is located in a special directory on the file server, but you can specify an alternative location for it by setting a preference option.
For staff and Research Students (NOT students on taught courses) it is very important that you should create a new directory called Mail within your own directory and then move your Home Mailbox into that directory. For example, in Windows 3.1:
- open the Main window, and double-click on the File Manager icon;
- click on the drive icon that gives you access to your directory on the Novell server; this is usually F: but if you are not sure then use the 'drop-down' button in the panel above the drive icons to see which drive letters you can choose from and select the one that, on Novell1 for instance, will look like:
F: NOVELL1/USER:- double-click on the folder labelled 'users' in the display panel, and you should see directory folder for your username displayed, eg smithfg;
- highlight the icon showing your username;
- from the menu bar, select File and then Create Directory;
- a dialog box appears; in the Name: area you should type MAIL and then press OK.
You should now have a Home Mailbox location with a pathname of the form
\\server\user\users\username\mail
where 'server' is your Novell server name eg Novell1, and 'username' is your own username, eg:
\\novell1\user\users\smithfg\mail
When giving alternative locations for your Home Mailbox, it is important that you use names of the form shown above. This form is guaranteed to work, whereas a pathname of the form F:\... may cause problems if you also use other PCs or multiple servers.
Users of other Novell servers not operated by Information Services need to contact their Novell Server Administrator to ask advice on the best location for their Home Mailbox.
You may want to change your home mailbox location if you have limited space on the file server in the default location, if you are concerned about the privacy of your mail, or for other reasons. You can also have more than one mailbox and change between them using this preference setting. You might want to do this if you received mail at your address for more than one person or organisation.
If you intend using both the Windows and DOS versions of Pegasus Mail, you must make sure that both versions use the same Home Mailbox. Within the DOS version you would go through the same process to ensure that it too is looking at the correct location for your mail and address books.
Once you have created a new directory for your mail, you can now tell WinPMail to change your Home Mailbox location as follows.
Note: before using this option, make sure that all windows in WinPMail are closed except the button panel (which can also be closed but does not have to be).
- Click on Tools Menu option;
- Click on Options... menu option;
- Select Home mailbox location from the Categories list on the left - the dialogue box should now look like this:
Fig 31
Delete anything in the box and type in the new path in NetWare format. This is the format \\server\user\users\username\mail described above; eg:
\\novell1\user\users\smithfg\mail
NOTE: THIS IS AN EXAMPLE ONLY. Users of central IS Novell servers should type in the path for the Mail directory you created for yourself by following steps 1 - 6 outlined above. If you are a user of another server, then your Novell Server Administrator can tell you which path you should type in.
a) To transfer all the existing files to the new location make sure that the Move mailbox contents to new location button is checked.
b) If you want to change the location for future mail files, but leave all your existing mail files where they are, make sure that the Move mailbox contents to new location button is not checked (this is how you would implement more than one mailbox as described above).
c) If you have moved your home mailbox but want to revert to the original location on the file server, press the Default button.
- Click on the Apply button. If you have chosen to move the contents of your home mailbox, WinPMail will do so as soon as you click OK.
Pegasus can now detect URLs in your messages. So if someone emails you about a particular Web site, then you can now simply double click on the URL in the message (it will appear in green), and your favoured Web Browser will be launched and the requisite URL will be opened (provided the URL is typed correctly in the email message!)
Fig 32
Before you can do this, you should use the Browse button to locate the browser that you use. This is done in a fairly standard way. For example - if you use Netscape Navigator and Windows 95 you would probably find the program file in a directory called:
program files\netscape\navigator\program\netscape.exe
or if you are using Windows 3.x, in:
netscape\netscape.exe
Once Pegasus knows where to find your browser, and you enable the clickable links option, you can then move directly from an email message to a specified URL.
These settings are fairly self-evident. The 'quoted text' referred to in the dialogue box is used when someone is replying to a previous message of yours. This makes it much easier to see what you said and what the sender has replied. You can even change the colour to suit your taste!
Fig 33
Although most of these setting should be left alone, there is one that might prove very useful to most users. When not actually using Pegasus you do not have to switch it off - you can run several applications at the same time. However, there is a Pegasus feature that allows you to minimise the application and yet see a "floating" icon on top of your current Windows' application that tells you if you have received any new mail. To use this feature, do the following:
You are presented with this dialog box (Fig 34):
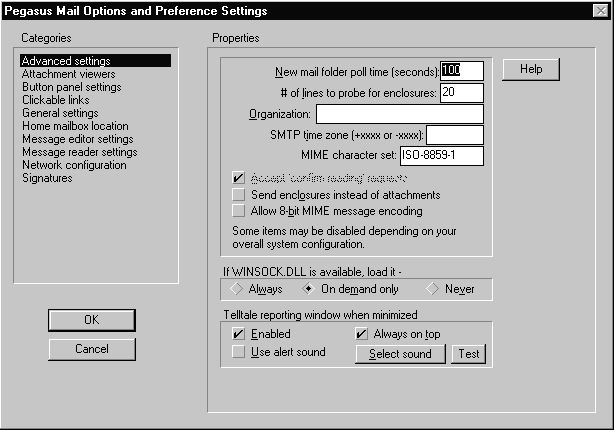 Fig 34 |
The Telltale window when minimised settings should include Enabled and Always on top.
When you minimise Pegasus for Windows you will now see this little window "floating" on top of your current application (Fig 35):
 Fig 35 |
To return to Pegasus, double-click on the horse icon.
Produced and Written by Paul Snell.